SERSTECH CHEMDASH FAQ
Below we have collected the most common questions about Serstech ChemDash. If you cannot find the answer you are looking for below, please contact our support team to get help. Click on a question to see its answer.

INTRODUCTION
What is ChemDash?
Serstech ChemDash is a software platform designed to work with Serstech’s handheld Raman spectrometers to manage information, users, libraries, and measurements.
ChemDash also allows you to manage users of the instruments and to set individual user rights. Libraries that are created in ChemDash can be exported to any number of instruments, thus making the instruments more valuable over time.
What are the key benefits of using ChemDash?
Serstech is continually adding new capabilities, but the most fundamental functions include the following:
- Configuration of your Serstech instruments
- Automatic upload and backup of all measurements made with your instruments
- View, print and share measurement reports
- Create your own spectra libraries from your measurements and/or with licensed spectrum data available in ChemDash
- Download spectra libraries to your instrument to customize and enhance your detection capabilities
- Add your own substance information in any language to libraries to customize result displays (GHS data, classifications and custom formats)
- Manage your system user accounts
CREATING AND MANAGING SPECTRAL DATABASES
What benefits does adding your own data to ChemDash offer?
Serstech provides future-proof and adaptable software, with a key feature being the capability to add your own data to the system and interact with it. The Serstech solution supports this in several ways:
- You can create your own spectral databases in the instrument. These can then be used as a reference future measurements. You can use your own data separately or mix it with licensed data while sampling.
- The ChemDash system lets you collect all your data and assemble your own packages, complete with customized chemical information messaging, which can be displayed locally in the instrument whenever a match is found. Additionally, you can download your databases to one or several instruments to ensure they are always up to date. Serstech’s experts are always on hand to assist you in setting up the system and aligning it fully with your needs.
CHEMDASH EDITIONS: LITE, PRO, PRO+
What is the difference between ChemDash lite and ChemDash Pro / Pro+?
ChemDash Lite
Supports one instrument
Create your own libraries and send them to your single device
No export functionality to share libraries with other organisations or departments
Create custom report templates
ChemDash Pro
Support multiple instruments
Create your own libraries
Export functionality to share libraries with other organisations or departments
Database Backup & Restore
Authentication logs
Audit logs
Multiple users work access
Edit spectrometer settings
Create custom report templates
ChemDash Pro+
Support multiple instruments
Create your own libraries
Export functionality to share libraries with other organisations or departments
Database Backup & Restore
Authentication logs
Audit logs
Multiple user’s work access
Edit spectrometer settings
Create custom report templates
How do I upgrade from ChemDash Lite to ChemDash Pro?
If you have a ChemDash Lite installation and connect an instrument with a Pro or Pro+ License the software will be automatically updated. Please note that you cannot downgrade in the same way. If you have a ChemDash Pro or Pro+ installation, you will not be able to connect an instrument with the ChemDash Lite license.
USER MANAGEMENT AND PREMISSIONS
What are the hierarchy levels for users in ChemDash?
ChemDash user hierarchy consists of the following levels:
- Super-Admin: Holds the same rights as the Admin and is responsible for initially granting Admin rights to new users.
- Admin: Possesses special rights, including user creation, report template creation, and the ability to manage libraries (add or remove).
- Active: Standard user with basic access, permissions for which are allocated by the Admin.
- Disabled: Represents a user whose credentials have been deactivated.
Is it possible to set different hierarchy levels and privileges for imported users?
Yes, you can customize hierarchy levels and assign specific privileges to imported users. Detailed instructions can be found in the documentation.
How can I set different privileges for users in ChemDash?
The Admin and Super-Admin have the authority to set privileges and define user rights.
Follow these steps:
- Navigate to the Admin tab in ChemDash.
- Click on the Users Management section.
- Select the specific user for whom you want to assign or modify privileges.
I am unable to log into the instrument and am locked out. How can I regain access?
- Connect to ChemDash
Start by connecting your instrument to ChemDash (make sure the instrument is powered on). - Navigate to Devices
In ChemDash, go to the “Devices” section. - Select Your Device
Locate your device in the list and click on it to access its details. - Unlock the User

- Click on the “Users” tab.
- Find the locked user and click the lock icon to unlock.
- Note: If needed, you can click on the user to open their details and edit the PIN code.
- Sync the Changes

- In the upper right corner, click the sync icon (two arrows).
- Find your device in the list and click the “Sync” button.
- Restart and Confirm
Your device will restart, and the user should now be unlocked.


MEASUREMENT MANAGEMENT IN CHEMDASH
How are measurements uploaded and managed in ChemDash?
Measurements are automatically transferred from the device to ChemDash when the instrument is connected. Users can access the Measurements section on the left-side menu to explore and manage their measurements effectively.
How can I find and filter measurements in ChemDash?
ChemDash provides various options for finding and filtering measurements:
- Users can sort items by clicking on column headers.
- The filtering icon offers options such as Favorite, Name, Device SN, Time, Version, Type, and Session number.
- The search icon allows users to search directly based on specific terms.
Can I view detailed information about a measurement in ChemDash?
Yes, users can view and edit measurement details by selecting the measurement and clicking on it. A window displays essential information, including measurement details, substance basic info, GHS information, and the spectrum graph.
How can I add comments or images to a measurement in ChemDash?
Users can add comments (Tags) and images to a measurement by accessing the Measurement Details section. Tags can be used for linking free text information, and relevant images can be uploaded to provide additional context to the measurement.
How is hazardous information presented in ChemDash?
ChemDash displays hazardous information using GHS pictograms and the signal word for the identified reference. If no match is found, this section is left empty.
Is there an option to compare multiple spectra in ChemDash?
Users can compare several spectra within a measurement. By selecting substances and using the compare option, ChemDash displays the spectra in the same graph with different colors. Users can selectively remove or display spectra using on/off buttons.
How can I create and download a report?
- Go to the Reports section in the menu and Click ‘Create Report’ button.

- Select a template.
- Add Relevant Substances you want in the report.
- Click on the ‘Generate’ button to create the report.
- After generating, provide a required Report name. Optionally, add a Report Header, notes and include a logo.
- Click on “Save report” to store the case report automatically in the Reports section.
- Select the generated report in the reports section and click on “Download” to save the report in PDF format.You can view a video demonstration of the procedure here.
How Can I Create a Report Template?
To create a report template, ensure you have Admin permissions.
- Navigate to the ‘Admin’ section.
- Select ‘Report Templates’ from the Admin menu.
- In the Report Templates section, choose ‘Create Report Template’ button.
- Add elements (information) for the case report.

Add element

Options of elements
5.Click on ‘Save’ to store the case report template for future use.

Save

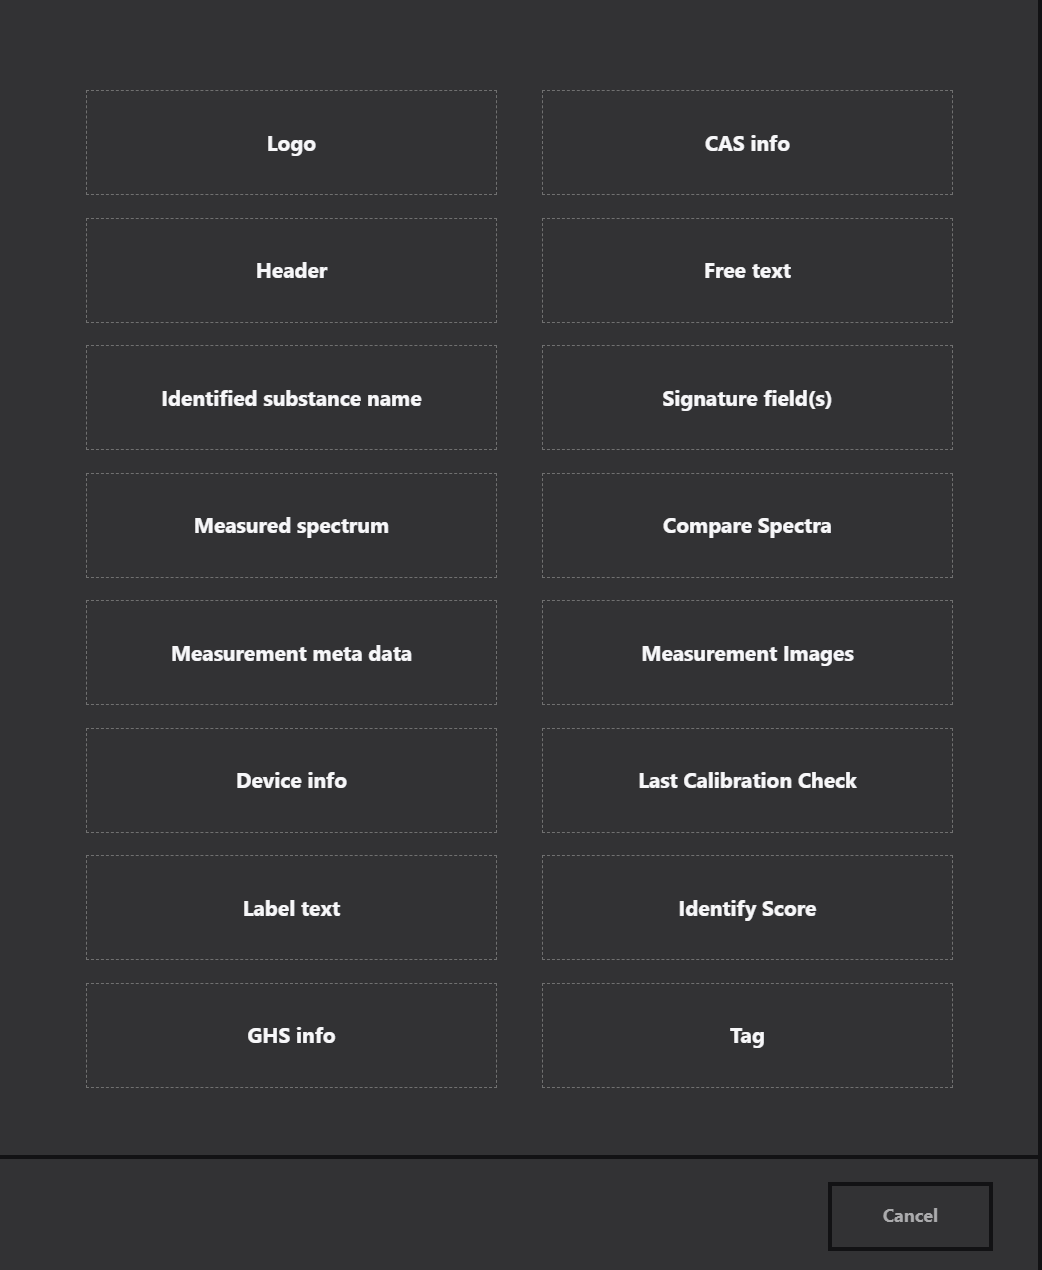
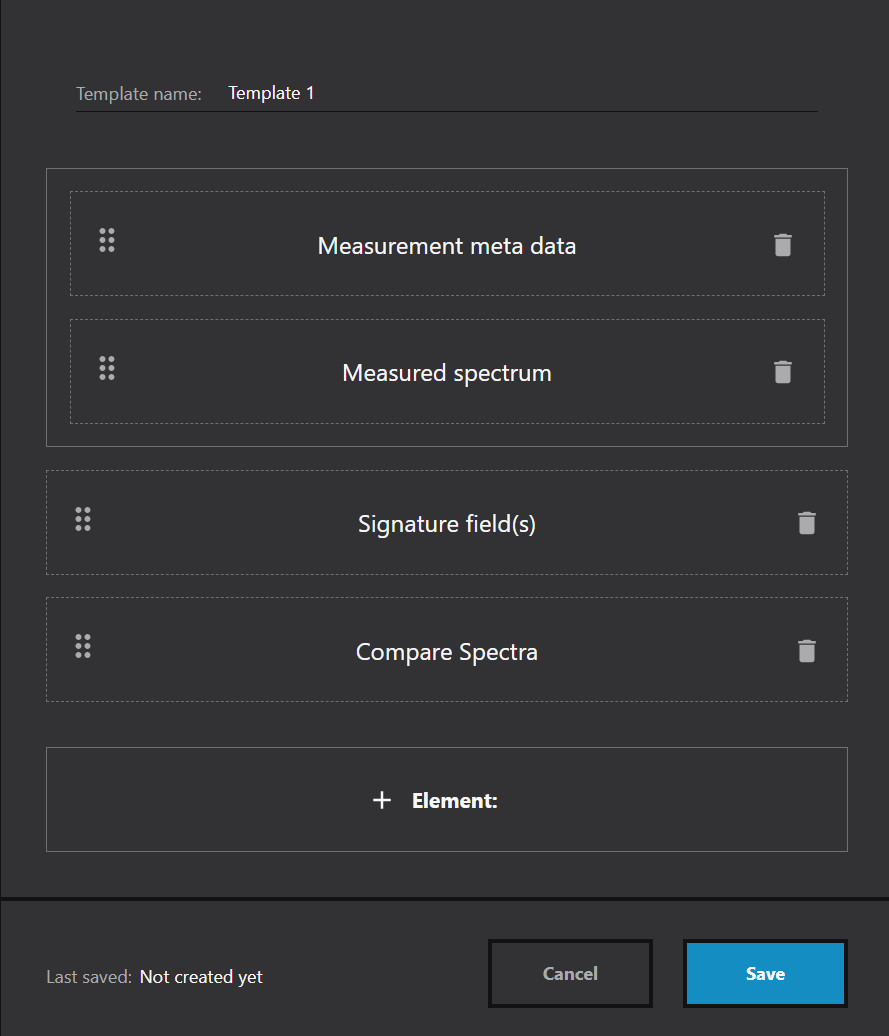
The case report is now saved in the Reports section and can be selected when creating a new report.
Note: The Admin can remove a template by select the template and clicking the expandable menu at the end of the row, then selecting ‘Remove.’
You can view a video demonstration of the procedure here.
How can I create a Library?
You can view a video demonstration of the procedure here.
SYSTEM MANAGEMENT AND OPERATIONS
Can I export spectra from ChemDash for external use?
Yes, users can export spectra from ChemDash in various formats (Jcamp, txt, csv). The Export function allows single or batch exports, providing flexibility for external use, such as in Excel.
What are the system requirements for installing ChemDash?
To ensure a smooth installation and optimal performance of ChemDash, your system should meet the following requirements:
- Processor: Intel or AMD processor with 64-bit support, clocked at 2GHz or faster.
- Operating System: Windows 10 (64-bit) Version 1903 or later.
- RAM: A minimum of 4 GB is required, but it is recommended to have 8 GB or more for optimal performance.
- Hard Disk Space: Make sure you have at least 10 GB of available hard disk space. Additional free space may be needed during installation and synchronization processes.
- Monitor Resolution: A display with a resolution of 1024×800 or greater is recommended.
How can I perform Database Backup or Restore the previous backup?
- In the Admin Section, go to ‘Databases Backups and Restore’.
- Choose the backup frequency (weekly or daily) based on your needs.
- Select the location where you want to save the backup.
- Click on the ‘Create Backup’ button to initiate the database backup.This function is crucial for audit purposes or emergencies, ensuring that your database is safely stored.
- To restore the database, click on the ‘Select Backup’ button and then ‘Restore Database’This action allows you to revert to a previous state of the database in case of any issues.
How can I connect the instrument to Wi-Fi?
The requirements for starting a Wi-Fi connection are:
▪ Device needs to have Wifi module or Wifi dongle
▪ Network 2.4Ghz, not 5Ghz
▪ Password type WEP or WPA2, not WPA3
▪ Complete WiFi setup flow in ChemDash
To connect the instrument using a Wi-Fi connection:
1. Start ChemDash
2. Connect the instrument via the USB cable, turn it on and log in as admin.
3. Go to Settings on the device and then to Wi-Fi and activate it.
4. Go to Devices section, select the instrument you have connected and click on it so that the details are displayed.
5. Click on the “Wi-Fi setup” button.
6. Fill in the Wi-Fi name and password.
7. After the setup is done, the information needs to be sent to the instrument. Sync
the instrument with ChemDash, by clicking on the Sync icon.
8. The instrument will now automatically restart. A message pops up and shows that the
device was connected.
It is important to note that when the instrument goes into sleep mode, the wireless
connection is lost
FIRMWARE UPDATE
How to Upgrade Arx Instrument in ChemDash?
We recommend using ChemDash for the upgrade process. Follow these steps:
Via ChemDash:
- Download the update file to your PC. *
- Open ChemDash and connect the instrument.
- Go to the Devices section and select the instrument.
- Click on the three dots on the right of the selected instrument and choose “Update Firmware.”
- Find the saved file on your computer file (i100-Arx-REL-xxxxxxx.tar.gz.gpg) by clicking the “Select file” button.
- Once the new firmware file is selected, click the “Upload firmware” button.
- A pop-up in ChemDash confirming the successful firmware update and the instrument automatically restarts to complete the update.Note: Keep the cable connected to both the instrument and the computer during the entire process.*Get the newest version you contact your local Serstech partner.
CONTACT SERSTECH
How do you manage Support?
Serstech has close relations with sales partners around the world. They are responsible for front line support and – in cooperation with us – provide dedicated local support.
Where can I buy Serstech ChemDash?
Please check under Contacts to find a sales partner near you. If there is nobody in your location or if you are interested in becoming a sales partner yourself, please contact Johan Raneke, VP Business Development , johan.raneke@serstech.com.
What additional services does Serstech offer?
We offer consulting services such as training or measurements to support the early phases of your project. You’re welcome to contact us, or any of our sales partners for more information.